After reinstalling Windows or after updating, an issue may occur where your laptop only sees certain neighbor Wi-Fi networks while missing your own home Wi-Fi. This error is usually caused by an incompatible driver or incorrect Wi-Fi channel reception configuration. This article will guide you on how to fix the issue where laptop only displays some Wi-Fi names using the following methods.
How to Fix Laptop Displaying Only Some Wi-Fi Names
Method 1: Reinstall Wi-Fi Driver Downloaded from Official Website
Press Windows + R keys to open the Run dialog. Type devmgmt.msc and press Enter to open Device Manager.
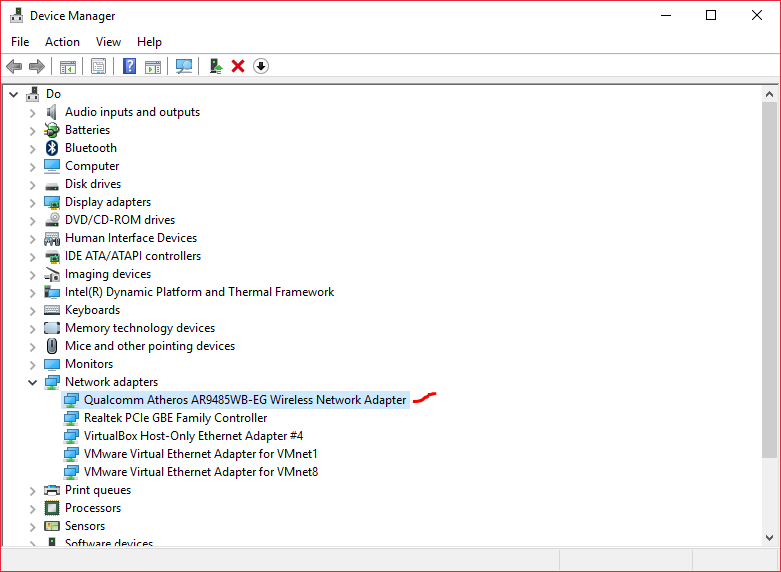
Select Network adapters, then right-click on the row containing Wireless Network Adapter and select Uninstall device to remove the Wi-Fi driver.
Next, borrow another laptop to download the official Wi-Fi driver from your laptop manufacturer's homepage and install it. For example, if your machine is an Asus K46CA, search Google for "driver Asus K46CA" and choose the link containing asus.com to download the correct driver.
If it still doesn't work after installation, try Method 2.
Method 2: Select Wi-Fi Channel Region (Country Region)
Open Device Manager as in Method 1, right-click on the Wi-Fi driver, choose Properties, and select the Advanced tab.
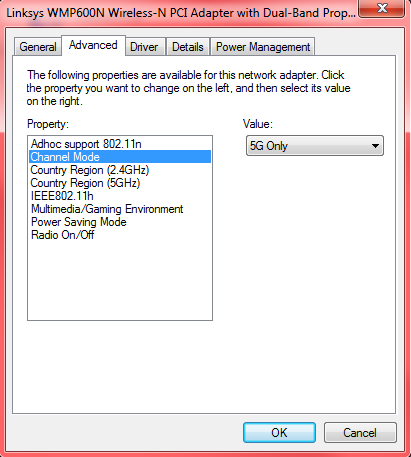
In Channel Mode, select 2.4GHz (some machines might not have this option).
In Country Region, select #x (1-13). Here, 1-13 represents the channels that allow the laptop to receive Wi-Fi signals broadcasting on channels 1 through 13.
After selecting, click OK and toggle Wi-Fi off and on to retest.
Method 3: Reconfigure Your Home Modem/Router Configuration
Some older laptops have Wi-Fi cards that only support the b/g standards. If your home Wi-Fi router is set to broadcast exclusively in n mode, your machine won't detect the Wi-Fi.
Log into your modem/router management page and change the broadcast mode to b/g/n.
The 3 methods above resolve almost 100% of the laptop only sees some Wi-Fi names problem.
Related keywords: Laptop cannot connect to home Wi-Fi.